Java Swing 中背景图片的实现
效果见
可以看到面板中间是空的。
想要实现这样一个透明的背景,首先要明白 Java Swing 的画图逻辑
但是,如果是面板嵌套。比如

这个时候, 如果想让 A1 的背景也透明。
按照 Java Swing 的逻辑,需要让 AA 透明、 A1 也透明
因为绘图时,是有图层的概念的。
需要写在下面绘图,然后再在上面绘图。
在 panel 的层级结构中,即需要让
从 AA 开始到 想要透明背景的组件 都要是透明的才可以。
其基本的使用方式有两种
setOpaque
JComponent.setOpaque(false)将背景设置为 Color(0,0,0,0)
Component.setColor()特殊情况之重绘
当按照上面的方案重绘时,比如直接使用 repaint 对当前的组件进行绘制。
这个时候,会 clean 当前的画布。
即会将当前组件的背景置为一个 getBackground 的值。
这个时候如果使用的 opaque 或者 transparent.
都会导致背景变成黑色。
见效果

所以,如果想要对透明背景进行重绘,那么必须从
【背景】→【…】→【组件】
这样一条链路都进行刷新。
特殊情况之 ScrollPanel
这里是遇到了一个特殊的需求。需要在 ScrollPanel 上进行透明背景。
经过阅读 ScrollPanel 的源码,发现。
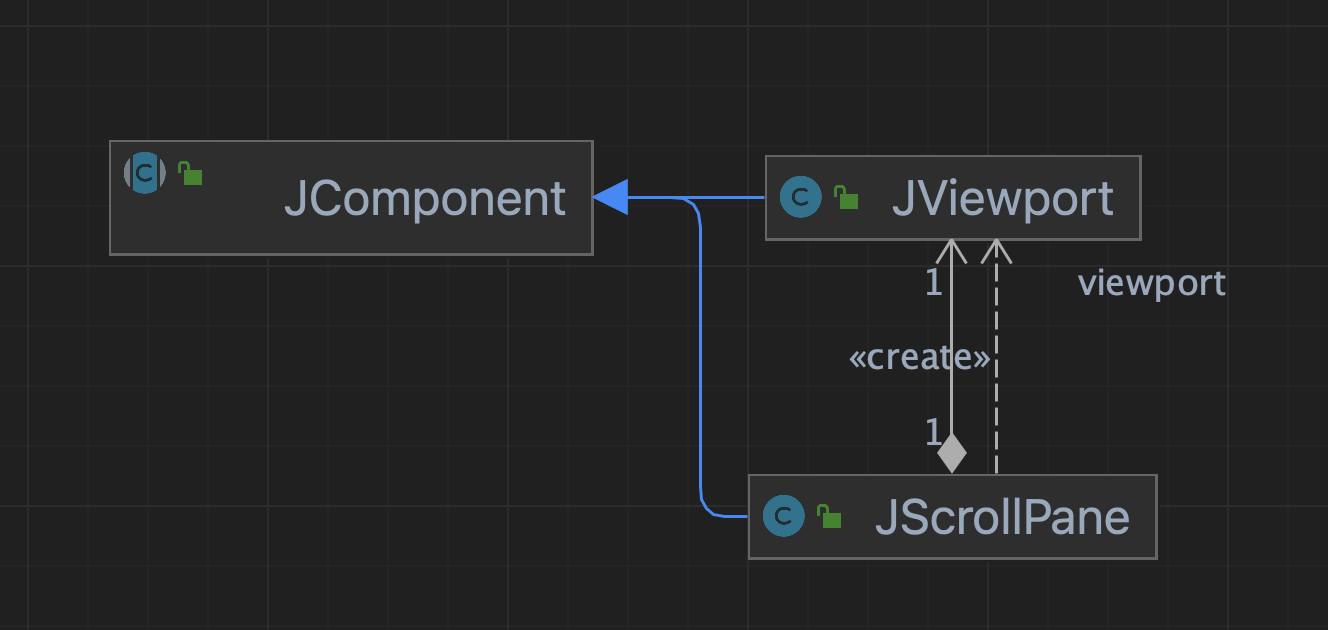
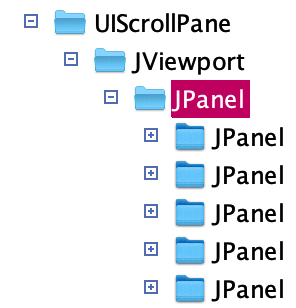
他的结构如上。
当超过 viewport 的大小的时候。就会出现滚动条。
但是当滚动时,他为了保证性能是增量绘制的逻辑。
因此导致出现了 重绘 的同样的问题。
但是由于增量绘制的逻辑,我本身不能控制。因此考虑只有两条路。
1- 修改增量绘制中的部分逻辑
2- 将增量绘制改为全量绘制
增量绘制
阅读源码,发现逻辑集中在 javax.swing.JViewport#setViewPosition 中
if ((oldX != newX) || (oldY != newY)) {
    if (!waitingForRepaint && isBlitting() && canUseWindowBlitter()) {
        RepaintManager rm = RepaintManager.currentManager(this);
        // The cast to JComponent will work, if view is not
        // a JComponent, isBlitting will return false.        JComponent jview = (JComponent)view;
        Rectangle dirty = rm.getDirtyRegion(jview);
        if (dirty == null || !dirty.contains(jview.getVisibleRect())) {
            rm.beginPaint();
            try {
                Graphics g = JComponent.safelyGetGraphics(this);
                flushViewDirtyRegion(g, dirty);
                // 标记当前的位置
                view.setLocation(newX, newY);
                Rectangle r = new Rectangle(
                    0, 0, getWidth(), Math.min(getHeight(), jview.getHeight()));
                g.setClip(r);
                // Repaint the complete component if the blit succeeded
                // and needsRepaintAfterBlit returns true.
                // mark-增量绘制
                repaintAll = (windowBlitPaint(g) &&
                              needsRepaintAfterBlit());
                g.dispose();
                rm.notifyRepaintPerformed(this, r.x, r.y, r.width, r.height);
                rm.markCompletelyClean((JComponent)getParent());
                rm.markCompletelyClean(this);
                rm.markCompletelyClean(jview);
            } finally {
                rm.endPaint();
            }
        }
        else {
            // The visible region is dirty, no point in doing copyArea
            view.setLocation(newX, newY);
            repaintAll = false;
        }
    }
    else {
        scrollUnderway = true;
        // This calls setBounds(), and then repaint().
        view.setLocation(newX, newY);
        repaintAll = false;
    }
    // we must validate the hierarchy to not break the hw/lw mixing
    revalidate();
    fireStateChanged();
}
void paintForceDoubleBuffered(Graphics g) {
RepaintManager rm = RepaintManager.currentManager(this);
Rectangle clip = g.getClipBounds();
rm.beginPaint();
setFlag(IS_REPAINTING, true);
try {
rm.paint(this, this, g, clip.x, clip.y, clip.width, clip.height);
} finally {
rm.endPaint();
setFlag(IS_REPAINTING, false);
}
}protected void paintDoubleBuffered(JComponent c, Image image,
Graphics g, int clipX, int clipY,
int clipW, int clipH) {
Graphics osg = image.getGraphics();
int bw = Math.min(clipW, image.getWidth(null));
int bh = Math.min(clipH, image.getHeight(null));
int x,y,maxx,maxy;
try {
for(x = clipX, maxx = clipX+clipW; x < maxx ; x += bw ) {
for(y=clipY, maxy = clipY + clipH; y < maxy ; y += bh) {
osg.translate(-x, -y);
osg.setClip(x,y,bw,bh);
if (volatileBufferType != Transparency.OPAQUE
&& osg instanceof Graphics2D) {
final Graphics2D g2d = (Graphics2D) osg;
final Color oldBg = g2d.getBackground();
g2d.setBackground(c.getBackground());
// 清理之前的区域
g2d.clearRect(x, y, bw, bh);
g2d.setBackground(oldBg);
}
// 遍历所有的子组件,并绘制
c.paintToOffscreen(osg, x, y, bw, bh, maxx, maxy);
g.setClip(x, y, bw, bh);
if (volatileBufferType != Transparency.OPAQUE
&& g instanceof Graphics2D) {
final Graphics2D g2d = (Graphics2D) g;
final Composite oldComposite = g2d.getComposite();
g2d.setComposite(AlphaComposite.Src);
// 将图片写入
g2d.drawImage(image, x, y, c);
g2d.setComposite(oldComposite);
} else {
g.drawImage(image, x, y, c);
}
osg.translate(x, y);
}
}
} finally {
osg.dispose();
}
}这里【遍历所有的子组件,并绘制】也有一些特殊点,
- 他的绘制是先把面板中已经有的,进行偏移
- 然后将新组件渲染,并写入
综上,完全找不到对增量的处理点。所以这个思路放弃。
全量绘制
1- 全量绘制一
首先是绘制后,感知到变动,再次绘制
            // 动态画图
            scrollViewport.addChangeListener(e -> repaintAll());
然而这样有一个问题,那就是不实时。会变成先渲染出来黑色的, 再恢复正常
见录屏
这个方案被放弃
2- 全量绘制二
将增量录制屏蔽掉,然后直接执行全量绘制。
即将上文中 javax.swing.JViewport#setViewPosition 复写
直接执行
@Override
public void setViewPosition(Point p) {

	setLocation(-p.x, -p.y);
	repaintAll();
}
发现隐藏掉的组件并不会渲染。
**猜测:全量绘制一 为什么能执行成功?也许增量绘制一次后,再次执行全量就不会出现问题 **
3- 全量绘制三
基于上面的猜测,作出下面的调整
JViewport scrollViewport = new JViewport() {

    /**
     * 从而屏蔽掉 {@link RepaintManager.PaintManager#paintDoubleBuffered(JComponent, Image, Graphics, int, int, int, int)}
     *     * @return 创建一个不会实际画图的 Graphics
     */    @Override
    public Graphics getGraphics() {
        Graphics graphics = super.getGraphics();
        return new FRGraphics2D((Graphics2D) graphics) {
            @Override
            public boolean drawImage(Image img, int x, int y, ImageObserver observer) {
                return true;
            }
        };
    }
};
// 动态画图
scrollViewport.addChangeListener(e -> repaintAll());- 执行增量绘制的逻辑,但屏蔽掉写入图片的逻辑
- 执行全量绘制的逻辑
从而让结果变得合适。
结论
很多时候,是需要理解原理才能理顺如何修改逻辑的。
就像这次这个问题,如果不知道如何绘制的原理,包括基础原理和针对 ScrollPanel 的绘制原理。
那么根本不可能解决这个问题。
所以,简单问题简单看,复杂问题从根源看。