服务化改造实践 | 如何在 Dubbo 中支持 REST - 知乎
通过 dubbo 来直接绑定到 servlet 上。
A. 在 REST 中使用 Annotation
在 Dubbo 中使用 annotation 而不是 Spring XML 来暴露和引用服务,对于 REST 协议来说并没有什么不同。有关如何使用 annotation 更详细的用法,请参阅《在 Dubbo 中使用注解》章节。这里主要展示一下与上面基于 Spring XML 配置的例子不同之处。
注:本章节讨论的示例可以通过 https://github.com/beiwei30/dubbo-rest-samples/tree/master/annotation 来获得
1. 使用 Java Configuration 来配置服务提供方的 protocol、registry、application
@Configuration
    @EnableDubbo(scanBasePackages = "org.apache.dubbo.samples.rest.impl") // #1
    static class ProviderConfiguration {
        @Bean // #2
        public ProtocolConfig protocolConfig() {
            ProtocolConfig protocolConfig = new ProtocolConfig();
            protocolConfig.setName("rest");
            protocolConfig.setPort(8080);
            protocolConfig.setServer("netty");
            return protocolConfig;
        }

        @Bean // #3
        public RegistryConfig registryConfig() {
            RegistryConfig registryConfig = new RegistryConfig();
            registryConfig.setProtocol("zookeeper");
            registryConfig.setAddress("localhost");
            registryConfig.setPort(2181);
            return registryConfig;
        }

        @Bean
        public ApplicationConfig applicationConfig() {
            ApplicationConfig applicationConfig = new ApplicationConfig();
            applicationConfig.setName("rest-provider");
            return applicationConfig;
        }
}- 通过
@EnableDubbo来指定需要扫描 Dubbo 服务的包名,在本例中,UserServiceImpl 在 “org.apache.dubbo.samples.rest.impl” 下 - 通过提供一个 ProtocolConfig 的 Spring Bean 来指定服务提供方按照 REST 来暴露服务
- 通过提供一个 RegistryConfig 的 Spring Bean 来指定服务提供方所使用的服务注册机制
2. 使用 Service 来申明 Dubbo 服务
@Service // #1
public class UserServiceImpl implements UserService {
    ...
}- 简单的使用
@Service或者@Service(protocol = "rest")修饰 “UserServiceImpl” 来申明一个 Dubbo 服务,这里protocol = "rest"不是必须提供的,原因是通过 Java Configuration 只配置了一个 ProtocolConfig 的示例,在这种情况下,Dubbo 会自动装配该协议到服务中
3. 服务提供方启动类
通过使用 ProviderConfiguration 来初始化一个 AnnotationConfigApplicationContext 实例,就可以完全摆脱 Spring XML 的配置文件,完全借助 annotation 来装配好一个 Dubbo 的服务提供方。
public class RestProvider {
    public static void main(String[] args) throws IOException {
        AnnotationConfigApplicationContext context = new AnnotationConfigApplicationContext(ProviderConfiguration.class);
        context.start();
        System.in.read();
    }
}
4. 使用 Java Configuration 来配置服务消费方的 registry、application
@Configuration
    @EnableDubbo(scanBasePackages = "org.apache.dubbo.samples.rest.comp") // #1
    @ComponentScan({"org.apache.dubbo.samples.rest.comp"}) // #2
    static class ConsumerConfiguration {
        @Bean // #3
        public RegistryConfig registryConfig() {
            RegistryConfig registryConfig = new RegistryConfig();
            registryConfig.setProtocol("zookeeper");
            registryConfig.setAddress("localhost");
            registryConfig.setPort(2181);
            return registryConfig;
        }

        @Bean
        public ApplicationConfig applicationConfig() {
            ApplicationConfig applicationConfig = new ApplicationConfig();
            applicationConfig.setName("rest-consumer");
            return applicationConfig;
        }
}- 通过
@EnableDubbo来指定需要扫描 Dubbo 服务引用@Reference的包名。在本例中,UserService 的引用在 “org.apache.dubbo.samples.rest.comp” 下 - 通过
@ComponentScan来指定需要扫描的 Spring Bean 的包名。在本例中,包含 UserService 引用的类 UserServiceComponent 本身需要是一个 Spring Bean,以方便调用,所以,这里指定的包名也是 “org.apache.dubbo.samples.rest.comp” - 通过提供一个 RegistryConfig 的 Spring Bean 来指定服务消费方所使用的服务发现机制
这里提到的 UserServiceComponent 的 Spring Bean 定义如下:
@Component
public class UserServiceComponent implements UserService { // #1
    @Reference
    private UserService userService;


    @Override
    public User getUser(Long id) {
        return userService.getUser(id);
    }

    @Override
    public Long registerUser(User user) {
        return userService.registerUser(user);
    }
}- 这里比较好的实践是让这个 Spring Bean 也继承
UserService接口,这样在调用的时候也可以面向接口编程
5. 服务调用方启动类
通过使用 ConsumerConfiguration 来初始化一个 AnnotationConfigApplicationContext 实例,就可以完全摆脱 Spring XML 的配置文件,完全借助 annotation 来装配好一个 Dubbo 的服务消费方。然后就可以通过查找 UserServiceComponent 类型的 Spring Bean 来发起远程调用。
public class RestConsumer {
    public static void main(String[] args) {
        AnnotationConfigApplicationContext context = new AnnotationConfigApplicationContext(ConsumerConfiguration.class);
        context.start();

        UserService userService = context.getBean(UserServiceComponent.class);
        System.out.println(">>> " + userService.getUser(1L));

        User user = new User(2L, "Larry Page");
        System.out.println(">>> " + userService.registerUser(user));
    }
}
B. 让协议跑在不同的服务器上
目前 REST 协议在 Dubbo 中可以跑在五种不同的 server 上,分别是:
- “netty”: 直接基于 netty 框架的 rest server,通过
<dubbo:protocol name="rest" server="netty"/>来配置 - “tomcat”: 基于嵌入式 tomcat 的 rest server,通过
<dubbo:protocol name="rest" server="tomcat"/>来配置 - “jetty”: 默认选项 ,基于嵌入式 jetty 的 rest server,通过
<dubbo:protocol name="rest" server="jetty"/>来配置 - “sunhttp”: 使用 JDK 内置的 Sun HTTP server 作为 rest server,通过
<dubbo:protocol name="rest" server="sunhttp"/>来配置,仅推荐在开发环境中使用 - “servlet”: 采用外部应用服务器的 servlet 容器来做 rest server,这个时候,除了配置
<dubbo:protocol name="rest" server="servlet"/>之外,还需要在 web.xml 中做额外的配置
由于以上的例子展示了 “netty” 作为 rest server,下面演示一下使用嵌入式 tomcat 的 rest server 的用法。
注:本章节讨论的示例可以通过 https://github.com/beiwei30/dubbo-rest-samples/tree/master/tomcat 来获得
1. 增加 Tomcat 相关的依赖
<dependency>
            <groupId>org.apache.tomcat.embed</groupId>
            <artifactId>tomcat-embed-core</artifactId>
        </dependency>
        <dependency>
            <groupId>org.apache.tomcat.embed</groupId>
            <artifactId>tomcat-embed-logging-juli</artifactId>
        </dependency>
2. 配置 protocol 使用 tomcat 作为 REST server
<dubbo:protocol name="rest" port="8080" server="tomcat"/>启动服务提供方之后,在以下的输出将会出现与嵌入式 Tomcat 相关的日志信息:
Jan 01, 2019 10:15:12 PM org.apache.catalina.core.StandardContext setPath
WARNING: A context path must either be an empty string or start with a '/' and do not end with a '/'. The path [/] does not meet these criteria and has been changed to []
Jan 01, 2019 10:15:13 PM org.apache.coyote.AbstractProtocol init
INFO: Initializing ProtocolHandler ["http-nio-8080"]
Jan 01, 2019 10:15:13 PM org.apache.tomcat.util.net.NioSelectorPool getSharedSelector
INFO: Using a shared selector for servlet write/read
Jan 01, 2019 10:15:13 PM org.apache.catalina.core.StandardService startInternal
INFO: Starting service [Tomcat]
Jan 01, 2019 10:15:13 PM org.apache.catalina.core.StandardEngine startInternal
INFO: Starting Servlet Engine: Apache Tomcat/8.5.31
Jan 01, 2019 10:15:13 PM org.apache.coyote.AbstractProtocol start
INFO: Starting ProtocolHandler ["http-nio-8080"]
C. 使用外部的 Servlet 容器
进一步的,还可以使用外部的 servlet 容器来启动 Dubbo 的 REST 服务。
注:本章节讨论的示例可以通过 https://github.com/beiwei30/dubbo-rest-samples/tree/master/servlet 来获得
1. 修改 pom.xml 改变打包方式
因为使用的是外部的 servlet 容器,需要将打包方式修改为 “war”
<packaging>war</packaging>2. 修改 rest-provider.xml
配置 “server” 为 “servlet” 表示将使用外部的 servlet 容器。并配置 “contextpath” 为 "",原因是在使用外部 servlet 容器时,Dubbo 的 REST 支持需要知道被托管的 webapp 的 contextpath 是什么。这里我们计划通过 root context path 来部署应用,所以配置其为 ""。
<dubbo:protocol name="rest" port="8080" server="servlet" contextpath=""/>3. 配置 WEB-INF/web.xml
<?xml version="1.0" encoding="UTF-8"?>
<web-app xmlns="http://xmlns.jcp.org/xml/ns/javaee"
         xmlns:xsi="http://www.w3.org/2001/XMLSchema-instance"
         xsi:schemaLocation="http://xmlns.jcp.org/xml/ns/javaee http://xmlns.jcp.org/xml/ns/javaee/web-app_3_1.xsd"
         version="3.1">
    <context-param> <!-- #1 -->
        <param-name>contextConfigLocation</param-name>
        <param-value>/WEB-INF/classes/spring/rest-provider.xml</param-value>
    </context-param>

    <listener>
        <listener-class>com.alibaba.dubbo.remoting.http.servlet.BootstrapListener</listener-class>
    </listener>

    <listener>
        <listener-class>org.springframework.web.context.ContextLoaderListener</listener-class>
    </listener>

    <servlet> <!-- #2 -->
        <servlet-name>dispatcher</servlet-name>
        <servlet-class>com.alibaba.dubbo.remoting.http.servlet.DispatcherServlet</servlet-class>
        <load-on-startup>1</load-on-startup>
    </servlet>
    <servlet-mapping>
        <servlet-name>dispatcher</servlet-name>
        <url-pattern>/api/*</url-pattern>
</servlet-mapping>- 配置 Dubbo 和 Spring 相关的 ContextListener,打开 Dubbo HTTP 支持,以及通过 rest-provider.xml 来装配 Dubbo 服务
- 配置 Dubbo HTTP 所需的 DispatcherServlet
这样做之后,不再需要 RestProvider 来启动 Dubbo 服务,可以将其从工程中删掉。对应的,现在 Dubbo 的服务将会随着 Servlet 容器的启动而启动。启动完毕之后,可以通过类似 “http://localhost:8080/api/users/1” 来访问暴露出的 REST 服务。需要注意的是,这个例子里假定了服务提供方的 WAR 包部署在 root context path 上,所以当该应用通过 IDE 配置的 tomcat server 启动时,需要指定 Application Context 为 ”/“。
D. 增加 Swagger 支持
在上面使用外部 Servlet 容器的例子的基础上,讨论如何暴露 Swagger OpenApi 以及如何继承 Swagger UI。
注:本章节讨论的示例可以通过 https://github.com/beiwei30/dubbo-rest-samples/tree/master/servlet 来获得
1. 暴露 Swagger OpenApi
增加 swagger 相关依赖,以便通过 “http://localhost:8080/openapi.json” 来访问 REST 服务的描述
<properties>
        <swagger.version>2.0.6</swagger.version>
    </properties>

    <dependencies>
        <dependency>
            <groupId>io.swagger.core.v3</groupId>
            <artifactId>swagger-jaxrs2</artifactId>
            <version>${swagger.version}</version>
        </dependency>
        <dependency>
            <groupId>io.swagger.core.v3</groupId>
            <artifactId>swagger-jaxrs2-servlet-initializer</artifactId>
            <version>${swagger.version}</version>
        </dependency>
    </dependencies>
修改 WEB-INF/web.xml,增加 openapi servlet 的配置
<web-app>
    ...
    <servlet> <!-- #3 -->
        <servlet-name>openapi</servlet-name>
        <servlet-class>io.swagger.v3.jaxrs2.integration.OpenApiServlet</servlet-class>
    </servlet>
    <servlet-mapping>
        <servlet-name>openapi</servlet-name>
        <url-pattern>/openapi.json</url-pattern>
        <url-pattern>/openapi.yaml</url-pattern>
    </servlet-mapping>
</web-app>
重新启动应用之后,可以通过访问 “http://localhost:8080/openapi.json” 或者 “http://localhost:8080/openapi.yaml” 来访问暴露出的 openapi 的契约,以下是 yaml 格式的表述:
openapi: 3.0.1
paths:
  /api/users/{id}:
    get:
      operationId: getUser
      parameters:
      - name: id
        in: path
        required: true
        schema:
          type: integer
          format: int64
      responses:
        default:
          description: default response
          content:
            application/json:
              schema:
                $ref: '#/components/schemas/User'
            text/xml:
              schema:
                $ref: '#/components/schemas/User'
  /api/users/register:
    post:
      operationId: registerUser
      requestBody:
        description: a user to register
        content:
          application/json:
            schema:
              $ref: '#/components/schemas/User'
          text/xml:
            schema:
              $ref: '#/components/schemas/User'
      responses:
        default:
          description: default response
          content:
            application/json:
              schema:
                type: integer
                format: int64
            text/xml:
              schema:
                type: integer
                format: int64
components:
  schemas:
    User:
      type: object
      properties:
        id:
          type: integer
          format: int64
        name:
          type: string
2. 集成 Swagger UI
在 pom.xml 中继续增加 swagger-ui 的依赖,这里使用的是 webjars 的版本,从集成的角度来说更加简洁。webjars 的工作机制可以参阅 webjars 官网 [[#fn5 |[5]]]
<properties>
        <swagger.webjar.version>3.20.3</swagger.webjar.version>
    </properties>
    <dependencies>
        <dependency>
            <groupId>org.webjars</groupId>
            <artifactId>swagger-ui</artifactId>
            <version>${swagger.webjar.version}</version>
        </dependency>
    </dependencies>
在工程的 webapp/WEB-INF 根目录下增加一个 HTML 文件,内容如下。HTML 文件名可以为任何名字,没有硬性要求,如果该文件被命名为 “swagger-ui.html”,那么你可以通过访问 “http://localhost:8080/swagger-ui.html” 来访问 swagger UI。本例为了演示方便起见,将其命名为 “index.html”,这样当访问 “http://localhost:8080” 时,就可以很方便的得到 swagger UI 的页面。
<!DOCTYPE html>
<html lang="en">
<head>
<meta charset="UTF-8">
<title>API UI</title>
<link rel="stylesheet" type="text/css" href="webjars/swagger-ui/3.20.3/swagger-ui.css" >
<link rel="icon" type="image/png" href="webjars/swagger-ui/3.20.3/favicon-32x32.png" sizes="32x32" />
<link rel="icon" type="image/png" href="webjars/swagger-ui/3.20.3/favicon-16x16.png" sizes="16x16" />
<style>
html
{
box-sizing: border-box;
overflow: -moz-scrollbars-vertical;
overflow-y: scroll;
}
*,
*:before,
*:after
{
box-sizing: inherit;
}
body
{
margin:0;
background: #fafafa;
}
</style>
</head>
<body>
<div id="swagger-ui"></div>
<script src="webjars/swagger-ui/3.20.3/swagger-ui-bundle.js"> </script>
<script src="webjars/swagger-ui/3.20.3/swagger-ui-standalone-preset.js"> </script>
<script>
window.onload = function () {
window.ui = SwaggerUIBundle({
url: "openapi.json",
dom_id: '#swagger-ui',
deepLinking: true,
presets: [
SwaggerUIBundle.presets.apis,
SwaggerUIStandalonePreset
],
plugins: [
SwaggerUIBundle.plugins.DownloadUrl
],
layout: "StandaloneLayout"
});
};
</script>
</body>
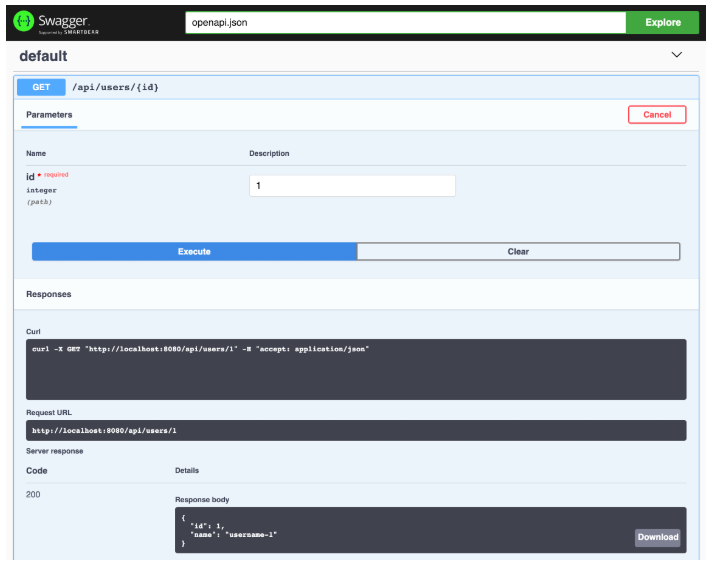
</html>再次重启服务器,并访问 “http://localhost:8080” 时,将会看到 swagger UI 页面的展示:
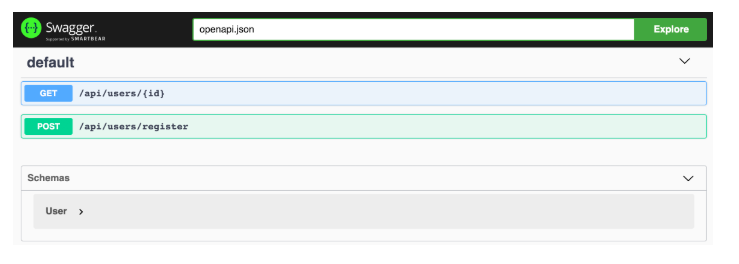
通过 Swagger UI 可以很方便的浏览当前服务器提供的 REST 服务的文档信息,甚至可以直接调用来做服务测试。以 ‘/api/users/{id}’ 为例,测试结果如下图所示: